My Puff-Sleeved Cardigan with the redone peplum.
I wish I could say I was happy with it, but I think it's only a slight improvement over the original. Somehow it seems a bit too big around the torso, and I'm still not sure it's the right length.
The photos didn't come out as well as I'd hoped, but then it rained for a large part of the weekend so there was no opportunity to take more pictures. The button band is all crooked and it looks a little weird with the two unbuttoned buttons at the bottom, but when I tried it on in front of the mirror it looked more like this, which I liked:
And here's the back, just cuz:
So....better than it was, but I'm not sure I'll wear it. I'll try though. I just don't want the other kids laughing at me for wearing funny clothes.
Showing posts with label puff-sleeved cardigan. Show all posts
Sunday, July 29, 2012
Sunday, July 8, 2012
Sunday Knitting
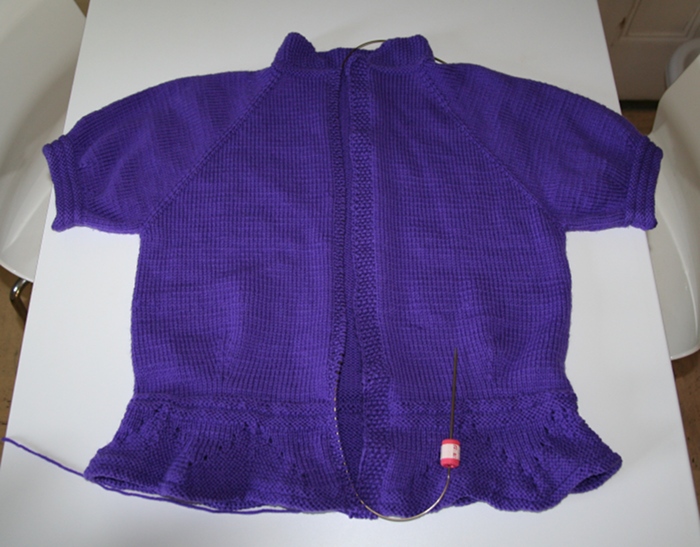
I was really hoping to have a finished Puff-Sleeved Cardigan to show you today but alas, it is not finished. Various events conspired against my progress such as last weekend's camping trip, Independence Day, and my insurmountable distaste for figuring out how to space button holes.
This is where I am.
I zipped through the button band in one evening. Soon thereafter I began the buttonhole band. The instructions say to pick up stitches and then place markers evenly to denote where the buttonholes will go. That of course is silly, since there are three whole rows of knitting to be done before making the button holes, so I just went ahead and knit those rows. Then stopped. And here I am.
Unlike many people, I don't actually dislike making button holes. It's just the maddening process of figuring out where to put them that drives me into a rage. I always think I'm being very smarty pants with my math and then realize I've overlooked some minor but important detail. And the fact that I can't remember where it is that I always go wrong just increases the likelihood of making the same mistake again. I suppose I should just get it over with, shouldn't I?
This is where I am.
I zipped through the button band in one evening. Soon thereafter I began the buttonhole band. The instructions say to pick up stitches and then place markers evenly to denote where the buttonholes will go. That of course is silly, since there are three whole rows of knitting to be done before making the button holes, so I just went ahead and knit those rows. Then stopped. And here I am.
Unlike many people, I don't actually dislike making button holes. It's just the maddening process of figuring out where to put them that drives me into a rage. I always think I'm being very smarty pants with my math and then realize I've overlooked some minor but important detail. And the fact that I can't remember where it is that I always go wrong just increases the likelihood of making the same mistake again. I suppose I should just get it over with, shouldn't I?
Sunday, June 24, 2012
Sunday Knitting
All was going smoothly on my re-knit of the Puff-Sleeved Cardigan peplum until I reached row 17 of the 20-row lace pattern. Suddenly I didn't have the right number of stitches in ANY of the repeats, but I just fudged it by doing a k2tog instead of a k3tog in each repeat. Then on row 19 I saw that each lace repeat begins and ends with a yarnover, but the next row doesn't indicate any special treatment in these areas -such as knitting the first and purling the second, or knitting the second through the back loop - even though you can't knit two yarnovers in a row. I became suspicious. I've made this sweater before. I went on Ravelry and looked at forum posts related to this pattern. I saw a couple from me.
Oh.
I had forgotten about this.
It's the Peplum of Vexation.
I just winged it like it did last time, but it still looks wrong, like it did last time. And like last time, there is STILL no update to the errata even though the lace chart is obviously wrong AND people have emailed the designer. I have become annoyed all over again.
But hey, the peplum is done! Again!
Here is my new, improved, shorter cardigan.
Now, just to make the button bands and sew on the buttons, tasks that I am not at all looking forward to.
Monday, June 4, 2012
Monday Knitting
This is a little late because yesterday was my birthday and I couldn't bring myself to do anything I didn't absolutely want to do.
Remember this?
I added some length before starting the peplum because I don't like cropped tops very much. Although it looks ok in the pictures I took, it became apparent that there's a reason why peplum tops are always so short. This sweater just looked weird. I've never worn it. But every fall, I pull it out with my other sweaters and every spring I wash it and pack it away again. This time, however, I decided to buck up and fix the damn thing.
Even though the sweater is top down, there's still a bit of difficulty in that the button bands - and buttons - were added after. So yesterday I sat down and removed all 11 buttons and undid the button bands. I can do this less painfully now that so much time has passed since I had to pick up all those stitches and sew on all those buttons.
Today I pulled out the peplum, more difficult than it should have been since I couldn't find the stupid end of yarn and so started in a mid-peplum spot where I had switched yarn skeins.
Next step: start knitting!
Remember this?
I added some length before starting the peplum because I don't like cropped tops very much. Although it looks ok in the pictures I took, it became apparent that there's a reason why peplum tops are always so short. This sweater just looked weird. I've never worn it. But every fall, I pull it out with my other sweaters and every spring I wash it and pack it away again. This time, however, I decided to buck up and fix the damn thing.
Even though the sweater is top down, there's still a bit of difficulty in that the button bands - and buttons - were added after. So yesterday I sat down and removed all 11 buttons and undid the button bands. I can do this less painfully now that so much time has passed since I had to pick up all those stitches and sew on all those buttons.
Today I pulled out the peplum, more difficult than it should have been since I couldn't find the stupid end of yarn and so started in a mid-peplum spot where I had switched yarn skeins.
Next step: start knitting!
Sunday, June 20, 2010
Puff-Sleeved Feminine Cardigan
Finally, it is done. Had I finished it a month ago I would probably have had a few opportunities to wear it right away, but now I will probably just pack it away until fall.
Pattern: Puff-Sleeved Feminine Cardigan from Fitted Knits by Stefanie Japel
Size: 36
Yarn: KnitPicks Merino Style in Iris (bought 12 skeins, have 1 or 2 leftover)
Needles: size 4 and size 3
Started: March 13 and finished sometime in early June
This Ravelry link has a couple of different pictures (and you should be able to view it even if you're not a member.)
Modifications: I added a lot to the length, because otherwise this would have been a very cropped sweater. Before the waist-shaping, I knit 35 rows instead of 17, and after the waist-shaping I knit 19 rows instead of 7. Because of the added length I made 11 buttonholes instead of 8. I used a stretchy bind-off for the sleeves.
Buttons: Expensive. I bought the only buttons that Windsor Button had in this color. They were over $2 each because they had a textured pattern on them, which isn't even showing because I wanted the plain side facing out. I looked at non-purple buttons, but really I just wanted something to blend in with the color of the sweater, not stand out or detract from it. I love cardigans, but I could do without having to choose buttons (not to mention sew them on.)
I'm mostly happy with how it turned out, but it is disappointingly boxy. Normally, I choose a size that is a bit small on me and block slightly larger so it is nice and form-fitting, but this time I knit it exactly to my size because the next smallest size would have probably been too small. It fits well, but is just a bit baggy around the waist. Perhaps I should have modified the waist-shaping somehow, but it's so hard to tell how anything will look once it's finished. I even think that maybe I shouldn't have added quite as much length. You can't tell in some of the pictures, but there's one at the Ravelry link above that shows the boxiness, and you can sort of tell in this picture of the back.
I do like the slightly puffed sleeves, and I like how it looks with the neckline open. I meant to take pictures of it buttoned up to the top (which is how it is pictured in the book) but forgot. Oh, and I love the color.
Labels:
cardigan,
FO,
knitting,
puff-sleeved cardigan,
stefanie japel
Saturday, June 12, 2010
A miracle has occurred!
Somehow, while watching an hour-long webinar on copyright issues, I managed to weave in all 647 ends on my sweater, wash it, and block it. Behold!

I apologize for the crappy photos. It's in one of the darkest rooms of the house and the sun hasn't been cooperating at all recently.
Maybe it’s not technically blocking as I didn’t pin it out. But I think, based on the Yarn Harlot’s recent post and my own sneaking suspicions, that the first time you wash a knitted garment it is by definition being blocked.
Anyhow, I cannot wait to pack this stupid sweater away for the summer. But sometime before I do that, there will be action photos!
I apologize for the crappy photos. It's in one of the darkest rooms of the house and the sun hasn't been cooperating at all recently.
Maybe it’s not technically blocking as I didn’t pin it out. But I think, based on the Yarn Harlot’s recent post and my own sneaking suspicions, that the first time you wash a knitted garment it is by definition being blocked.
Anyhow, I cannot wait to pack this stupid sweater away for the summer. But sometime before I do that, there will be action photos!
Labels:
cardigan,
knitting,
puff-sleeved cardigan,
stefanie japel
Tuesday, May 25, 2010
Interlude
While waiting for my buttons to magically attach themselves to my cardigan, let’s look at one of my favorite design features of this garment.

These bands were created through a simple pattern of knit rows and purl rows. There’s a set of bands running around the whole cardigan, separating the peplum from the body, as well as at the edges of the sleeves.
If you’ve looked through the patterns in Fitted Knits, you may have noticed that these are a theme. They make lovely borders and edgings, and I have no idea why Stefanie Japel has apparently cornered the market on this very simple but lovely technique. I never see other designers use this, but it’s one of the things I really like about Japel’s designs.

These bands were created through a simple pattern of knit rows and purl rows. There’s a set of bands running around the whole cardigan, separating the peplum from the body, as well as at the edges of the sleeves.
If you’ve looked through the patterns in Fitted Knits, you may have noticed that these are a theme. They make lovely borders and edgings, and I have no idea why Stefanie Japel has apparently cornered the market on this very simple but lovely technique. I never see other designers use this, but it’s one of the things I really like about Japel’s designs.
Labels:
cardigan,
knitting,
puff-sleeved cardigan,
stefanie japel
Tuesday, April 27, 2010
I may need more coffee for this
Last week I completed the first sleeve of my cardigan. The bound-off edge felt a little tight, but I thought I could just block it a bit. So I went ahead and seamed the sleeve, closed up the small hole in the armpit and weaved in the end of my yarn. "Finished!" I thought, and moved on to the next sleeve.
But I knew it was too tight. I tried it on, and it pulled at the sleeve of the shirt I was wearing under it. Maybe blocking would help, but you cannot hold out hope that blocking will solve all of your problems - believe me, I have tried it and been disappointed.
I just finished the second sleeve, using this fabulous stretchy bind-off. It is a miracle! A nice stretchy edge without flaring or otherwise looking odd. (I used this bind-off for my black v-neck sweater and the flaring was fine for that sweater, but not appropriate for this one!) But this new bind-off doesn't at all alter the look of the finished edge, making it just perfect for this sweater.
So. Now I must undo the bind-off for the first sleeve and redo it using this new miracle stretchy bind-off. Had I lazily left my weaving-in until the end it would have been much easier, but no - being Little Miss Knitting Overachiever, I try to weave in my ends as I go to make things easier on myself. Ha! Let this be a lesson to me. Now, you may be thinking that undoing the seam and woven in end is not a big deal, but it can be perilous indeed. For instance, there is that time I had to undo a seam and after undoing my woven in end and continuing along, I realized that I was actually unraveling the piece of knitted fabric.
Luckily, this time I managed to avoid that disaster, and now I have begun undoing my sleeve seam (my lovely, neat seam of which I was so proud!)
The danger has passed and it should be a piece of cake from here on out. I have undone many a standard bind-off so I do not anticipate trouble there. Sure, this has set me back a little, but extra time is well worth it to fix something that may make the difference between wearing the sweater and not wearing sweater. Had I not taken the time to make this better I would surely regret it later!
But I knew it was too tight. I tried it on, and it pulled at the sleeve of the shirt I was wearing under it. Maybe blocking would help, but you cannot hold out hope that blocking will solve all of your problems - believe me, I have tried it and been disappointed.
I just finished the second sleeve, using this fabulous stretchy bind-off. It is a miracle! A nice stretchy edge without flaring or otherwise looking odd. (I used this bind-off for my black v-neck sweater and the flaring was fine for that sweater, but not appropriate for this one!) But this new bind-off doesn't at all alter the look of the finished edge, making it just perfect for this sweater.
So. Now I must undo the bind-off for the first sleeve and redo it using this new miracle stretchy bind-off. Had I lazily left my weaving-in until the end it would have been much easier, but no - being Little Miss Knitting Overachiever, I try to weave in my ends as I go to make things easier on myself. Ha! Let this be a lesson to me. Now, you may be thinking that undoing the seam and woven in end is not a big deal, but it can be perilous indeed. For instance, there is that time I had to undo a seam and after undoing my woven in end and continuing along, I realized that I was actually unraveling the piece of knitted fabric.
Luckily, this time I managed to avoid that disaster, and now I have begun undoing my sleeve seam (my lovely, neat seam of which I was so proud!)
The danger has passed and it should be a piece of cake from here on out. I have undone many a standard bind-off so I do not anticipate trouble there. Sure, this has set me back a little, but extra time is well worth it to fix something that may make the difference between wearing the sweater and not wearing sweater. Had I not taken the time to make this better I would surely regret it later!
Labels:
cardigan,
knitting,
puff-sleeved cardigan,
stretchy bind-off,
sweater
Wednesday, April 21, 2010
Peplum of vexation
Well. I have completed the lacy peplum on my cardigan, and I’m sorry to report that it is fraught with problems. I shouldn't blame the peplum itself, of course, when fault actually lies with the chart. It is a very simple chart and the errors aren’t until the end, but that may have made it even more frustrating. There I was knitting along, almost at the end, and all of a sudden – stymied!
It is a 20-row chart, and on row 17 I realized that something was horribly wrong. The number of stitches I had on my needles did not match the chart. It was only off by one, but it was the same for every repeat of the lace pattern (6 total) so I was sure the problem was not me making the same error 6 times. I studied the chart and, sure enough, based on the previous rows, the stitch count for row 17 was incorrect. So I just winged it, because it was rather minor and I was SO close to the end.
The next problem was that in rows 17 and 19 each lace repeat begins and ends with a yarn over – that means there are places where there are two YOs in a row, resulting in a big gaping hole. Intentional? Who knows.
As I studied my knitting, a third issue became apparent. The eyelets made from all those YOs are supposed to make nice even diagonal lines and they do not – they are staggered in groups of 2 eyelets on top of each other. It is very difficult to see, but trust me - each of the eyelets you see has another directly below it. If I pull gently on the fabric, they become more visible, and probably will with blocking too.

The picture in the book clearly shows lovely rows of 10 eyelets, all perfectly diagonal as they were intended.

But when I looked on Ravelry, every single finished version of this sweater looked like mine – a veritable stairstep of eyelets stacked in pairs in such a way that when you don’t look closely it looks like a diagonal line of just 5 eyelets. Not one looked like the sweater pictured in the book.

I can live with how it looks, but I'm not at all happy about the fact that the peplum on the original sweater was obviously not knit from the same chart published in the book. This is all especially disappointing because Fitted Knits has been out for a few years and an errata is available – but it contains nothing about this chart. This is also one of the most popular patterns from the book, so it is even more frustrating that corrections haven’t been provided.
Nevertheless, the sweater is coming out well. Luckily the peplum is just a small part of the sweater that will be down by my waist and therefore not very noticeable. (Except by anyone who is reading this post right now and will consequently spot my faulty eyelets immediately.) I’m hoping it is finished soon because I’ve really been wanting to wear it – the weather is perfect for a short-sleeved cardigan right now!
It is a 20-row chart, and on row 17 I realized that something was horribly wrong. The number of stitches I had on my needles did not match the chart. It was only off by one, but it was the same for every repeat of the lace pattern (6 total) so I was sure the problem was not me making the same error 6 times. I studied the chart and, sure enough, based on the previous rows, the stitch count for row 17 was incorrect. So I just winged it, because it was rather minor and I was SO close to the end.
The next problem was that in rows 17 and 19 each lace repeat begins and ends with a yarn over – that means there are places where there are two YOs in a row, resulting in a big gaping hole. Intentional? Who knows.
As I studied my knitting, a third issue became apparent. The eyelets made from all those YOs are supposed to make nice even diagonal lines and they do not – they are staggered in groups of 2 eyelets on top of each other. It is very difficult to see, but trust me - each of the eyelets you see has another directly below it. If I pull gently on the fabric, they become more visible, and probably will with blocking too.

The picture in the book clearly shows lovely rows of 10 eyelets, all perfectly diagonal as they were intended.

But when I looked on Ravelry, every single finished version of this sweater looked like mine – a veritable stairstep of eyelets stacked in pairs in such a way that when you don’t look closely it looks like a diagonal line of just 5 eyelets. Not one looked like the sweater pictured in the book.

I can live with how it looks, but I'm not at all happy about the fact that the peplum on the original sweater was obviously not knit from the same chart published in the book. This is all especially disappointing because Fitted Knits has been out for a few years and an errata is available – but it contains nothing about this chart. This is also one of the most popular patterns from the book, so it is even more frustrating that corrections haven’t been provided.
Nevertheless, the sweater is coming out well. Luckily the peplum is just a small part of the sweater that will be down by my waist and therefore not very noticeable. (Except by anyone who is reading this post right now and will consequently spot my faulty eyelets immediately.) I’m hoping it is finished soon because I’ve really been wanting to wear it – the weather is perfect for a short-sleeved cardigan right now!
Labels:
cardigan,
fitted knits,
knitting,
misfortune,
puff-sleeved cardigan,
stefanie japel,
sweater
Monday, April 12, 2010
Lengthening the Cardigan
I’ve made a lot of progress on my cardigan since I last showed it to you.

I'm happy to report that my previous concerns about the size of the armholes were apparently unfounded.
The pattern, as written, produces a fairly cropped sweater. It’s not that noticeable from the picture in the book, but the featured photo on the Ravelry page really shows how short it is. Like many others before me, I’ve added several inches of length.
Since it’s knit top-down in one piece it can be tried on periodically and adjusted as needed. It’s a time-consuming process though – having it on the needles distorts it enough that you really need to thread it on a piece of waste yarn to try on. And then put it back on the needles, knit another several rows, and do it all over again.
For anyone who cares about technical specifics, these are the exact changes I have made: Before the waist shaping it says to do 17 rows of stockinette; I did a total of 35. After the waist shaping you are supposed to work 7 rows in stockinette, and I did a total of 19. All together, that’s 30 extra rows, or almost 4 inches (I am getting 8 rows/inch.) Here's a close up of the waist shaping.

Adding length means I’m using more yarn, of course. I have more than enough since I originally bought it for a long-sleeved cardigan, but the small yardage per ball means many ends to weave in. Compounding that is the fact that I keep coming across odd little patches where the yarn appears to have been spliced together with glue (ok, I may be making that up, but that is what it feels like!) and I need to cut those parts out, resulting in more ends. Still, knitting it all in one piece greatly reduces the necessary finishing. And I still really like the yarn – great color and the price is right!

I'm happy to report that my previous concerns about the size of the armholes were apparently unfounded.
The pattern, as written, produces a fairly cropped sweater. It’s not that noticeable from the picture in the book, but the featured photo on the Ravelry page really shows how short it is. Like many others before me, I’ve added several inches of length.
Since it’s knit top-down in one piece it can be tried on periodically and adjusted as needed. It’s a time-consuming process though – having it on the needles distorts it enough that you really need to thread it on a piece of waste yarn to try on. And then put it back on the needles, knit another several rows, and do it all over again.
For anyone who cares about technical specifics, these are the exact changes I have made: Before the waist shaping it says to do 17 rows of stockinette; I did a total of 35. After the waist shaping you are supposed to work 7 rows in stockinette, and I did a total of 19. All together, that’s 30 extra rows, or almost 4 inches (I am getting 8 rows/inch.) Here's a close up of the waist shaping.

Adding length means I’m using more yarn, of course. I have more than enough since I originally bought it for a long-sleeved cardigan, but the small yardage per ball means many ends to weave in. Compounding that is the fact that I keep coming across odd little patches where the yarn appears to have been spliced together with glue (ok, I may be making that up, but that is what it feels like!) and I need to cut those parts out, resulting in more ends. Still, knitting it all in one piece greatly reduces the necessary finishing. And I still really like the yarn – great color and the price is right!
Monday, March 15, 2010
Surprise Knitting, Part 2
Months ago, I bought the pattern for the Coraline cardigan, but had difficult finding affordable yarn. DK weight Alpaca doesn't come cheap. Ultimately I bought KnitPicks Merino Style. I swatched, washed and blocked the swatches, didn't take any notes, and then lost both swatches. Earlier this week I swatched again and determined the yarn and pattern just weren't a good match. Knit loose enough to achieve the drape I wanted, the gauge was too far off. I should have gotten some alpaca.
But I had all this lovely purple yarn wanting to be a cardigan! So I search Ravelry for cardigans made with this yarn (really, what would I do without Ravelry?) and found Stefanie Japel's Puff-Sleeved Feminine Cardigan from her book Fitted Knits. I've already made 3 sweaters from this book but haven't picked it up in a while and had almost forgotten about this sweet little cardigan. It is short-sleeved too, so I may actually finish this during a time of year in which it will be appropriate to wear.
I've made great headway so far, despite spending hours knitting yesterday afternoon only to spend the entire evening undoing what I had done.

I do have some concerns. The gauge swatch changed after washing and blocking, but as we all know, swatches lie. Additionally, a stockinette swatch will stretch more than a sweater than is mostly stockinette but also has raglan increases. I have found through experience that raglan seams don’t stretch especially well.
This is related to my other concern, which is that the shoulder and arm fit will be too tight, as happens with most patterns. I will be doing some measuring and looking at instructions for a larger size – it may be a simple adjustment.
But what of Coraline? I still want to make that sweater as well, but may need to pony up for an actual Alpaca blend yarn. Since I only need so many purple cardigans, I am thinking of gray for Coraline which I believe was my original plan for that sweater.
Meanwhile, it's nice to have a sweater on the needles again! I suspect this sweater will go quickly, so if all goes according to plan I should have frequent updates.
But I had all this lovely purple yarn wanting to be a cardigan! So I search Ravelry for cardigans made with this yarn (really, what would I do without Ravelry?) and found Stefanie Japel's Puff-Sleeved Feminine Cardigan from her book Fitted Knits. I've already made 3 sweaters from this book but haven't picked it up in a while and had almost forgotten about this sweet little cardigan. It is short-sleeved too, so I may actually finish this during a time of year in which it will be appropriate to wear.
I've made great headway so far, despite spending hours knitting yesterday afternoon only to spend the entire evening undoing what I had done.

I do have some concerns. The gauge swatch changed after washing and blocking, but as we all know, swatches lie. Additionally, a stockinette swatch will stretch more than a sweater than is mostly stockinette but also has raglan increases. I have found through experience that raglan seams don’t stretch especially well.
This is related to my other concern, which is that the shoulder and arm fit will be too tight, as happens with most patterns. I will be doing some measuring and looking at instructions for a larger size – it may be a simple adjustment.
But what of Coraline? I still want to make that sweater as well, but may need to pony up for an actual Alpaca blend yarn. Since I only need so many purple cardigans, I am thinking of gray for Coraline which I believe was my original plan for that sweater.
Meanwhile, it's nice to have a sweater on the needles again! I suspect this sweater will go quickly, so if all goes according to plan I should have frequent updates.
Subscribe to:
Posts (Atom)